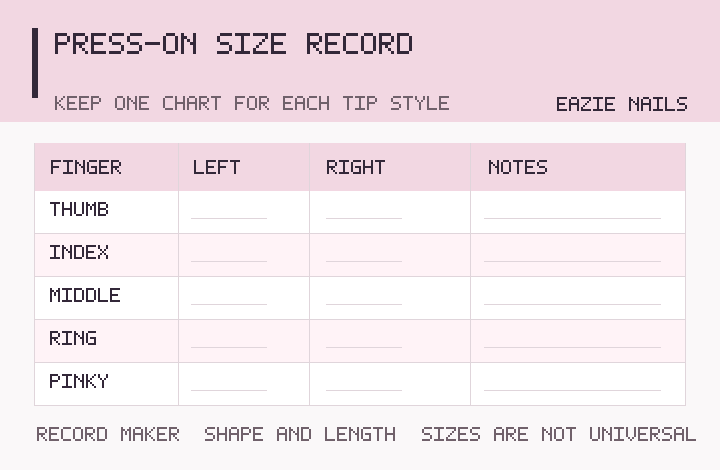
A press-on nail size chart is most useful when it records the exact set you tried, not just ten numbers. The left and right hands may need different pieces, and a size number on one maker’s tips is not guaranteed to match a different mold. Use the worksheet below to keep the information that will help you choose a replacement set later.
Whether you are testing a mixed-size box or using a custom maker’s sizing kit, fill in your record before applying adhesive. If you are still deciding what fits, start with the dry-fit checklist.
Write down the information that makes the numbers meaningful
- Maker and exact collection: a brand and product name, not simply “pink almond nails.”
- Shape, length and tip mold: a short almond and a long square may not use the same shape or curve, even from one shop.
- How you measured: either physical sample-tip numbers or the specific product’s millimeter measurement method. Do not treat those as interchangeable.
- Each of the ten fingers: left thumb through left pinky and right thumb through right pinky. Do not mirror five sizes automatically.
- Any fit notes: for instance, “right thumb needs a wider tip” or “size 4 covers width but rocks.” Record what you actually observed, not an assumed universal rule.
Copy or print this ten-finger worksheet
Maker / product: _________________________________
Shape, length and collection: _________________________________
Date tested: _________________ Method / size chart: __________________
| Finger | Left tip size | Right tip size | Width / fit notes |
|---|---|---|---|
| Thumb | ________ | ________ | ________________ |
| Index | ________ | ________ | ________________ |
| Middle | ________ | ________ | ________________ |
| Ring | ________ | ________ | ________________ |
| Pinky | ________ | ________ | ________________ |
If the seller requires widths in millimeters, put those values in the last column, explicitly labeled “mm.” If it requires numbers stamped on sample tips, record the numbers and keep the maker’s original chart. A measurement such as 13 mm is not automatically “size 3” in every collection.
The original worksheet graphic accompanying this guide is a blank place to record fit results. It is not a universal conversion chart and does not assign actual sizes to any Eazie Nails product.
Example: why two five-number lists can be confusing
Imagine a custom set whose selected sample numbers are 2, 5, 4, 6, 9 from left thumb to left pinky, but the right thumb fits a 1. A note that says only “2-5-4-6-9” leaves the maker guessing about the other hand. A useful order record would instead say:
| Hand | Thumb | Index | Middle | Ring | Pinky |
|---|---|---|---|---|---|
| Left | 2 | 5 | 4 | 6 | 9 |
| Right | 1 | 5 | 4 | 6 | 9 |
These are hypothetical numbers to show the recording format—not actual Eazie Nails product sizes. Your chosen seller may ask for a completely different format or a predefined assortment. Follow the ordering instructions for your particular set.
How to collect the sizes before saving them
- Lay out the loose press-ons or correct sizing-kit samples in their original numbered order. Leave adhesive unopened.
- Test-fit the left thumb, then the remaining four fingers. Compare each candidate from above and the fingertip without pressing through discomfort.
- Repeat on the right hand. Check the sidewalls, base shape and crosswise curve, not width alone.
- Record the selected number or measurement for each finger and note uncertainties. If two sizes fit poorly in different ways, do not record either as “perfect.”
- Photograph the completed record alongside the product name or save a digital note with the collection, shape and date. Keep the same units the seller used.
For step-by-step sizing methods, see measuring natural nail width and using a custom-set sizing kit. Different brands give different between-size instructions; the Olive & June fitting guide is a useful example of a brand-specific process, not a universal conversion chart.
When to revise your saved fit record
Recheck the actual product if you switch brands, shapes, lengths or collections. Also revisit a result if a piece keeps lifting at one side, feels tight, or sits with a noticeable center gap. Wear problems can have more than one cause, so note whether the issue appears during a loose dry fit or only after application.
Do not keep an uncomfortable nail on simply because the number appears on your chart. A press-on should not need excessive pressure to fit. When the piece reaches the sides but rocks, compare its curve before automatically sizing up or down.
Use the record for the next set
When returning to the same compatible product, the chart is a practical starting point. When moving to a different brand, use it as a reference only and check that new maker’s size chart or sample tips. The Find Your Fit page also offers a ten-finger worksheet and a full selection checklist.
Eazie Nails currently presents its collection as Coming Soon. If a product page does not specify how its sizes are distributed, contact Eazie Nails with the exact product and option rather than assuming the example numbers apply.
The conversation